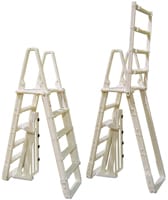
Ladder – Economy Ladder
$399.99
Product Details
Ladder – Economy Ladder
Add an economy ladder for your pool
The Ocean Blue A-Frame Ladder is built to last. It uses minimal hardware for easy assembly. Designed to fill with water, the A-Frame ladder requires no additional weights. It comes with a simple lift and lock feature for easy assembly and includes a padlock for extra safety. The Ocean Blue A-Frame has a 300 pound capacity and easily adjusts to fit above ground pools up to 56′. With safety in mind, the A-Frame Ladders outer steps can slide up and lock in place, protecting from unwanted entry.
Ladder – Economy Ladder
Tools Needed: Rubber Mallet
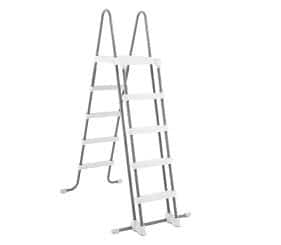
Step #1
#1: Lay out the Swing-up
Rails and Swing-up Treads as
shown.
NOTE: The bottom Swing-up
Tread has a “house shaped”
tab and is positioned at the
bottom of the Swing-up Rail.
#3: Place the remaining Swing-up
Rail over the tabs of the Swing-up
Treads and tap into place using the
rubber mallet. Set this assembly
aside.
#1: Slip one of the Adjustable Rail
Boots over the end of a Side Rail.
It will need to be all the way on
if the outside dimension of your
pool is 50” or
backed off to
the marked
number that
corresponds
with the height
of your pool.
#2: Using two 1/4-20 x 1 1/2” long
bolts and two 1/4-20 hex nuts,
fasten the Adjustable Rail Boot to
the Side Rail. Repeat for remaining
three Side Rails.
Step #3 continued
Ladder – Economy Ladder
Step #2
Tools Needed: Rubber Mallet, cordless drill with Phillips bit.
#2: Using a rubber mallet, tap the
Swing-up Treads into place.
Adjustable Rail Boots are not required if the outside height of your pool
(measured from the ground to the top of the pool ledge) is 48” or less. If
this measurement is more than 48” rail boots will be required. If the outside measurement of your pool is 48” or less, skip to step 3.
#1: Overlap the flat end of the
Handrail onto the top of the Side
Rail. Using two 1/4 – 20 x 5/8” bolts
and two 1/4- 20 hex nuts, attach the
Handrail to the Side Rail. Repeat for
the remaining three Side Rails.
Step #3
Tools Needed: Rubber Mallet, cordless drill with Phillips bit.
– 3 –
Step #3 continued
#2: Lay one of
the Side Rail
assemblies on a
flat surface.
Matching the
tabs in the Fixed
Ladder Treads
to the notches
in the Side Rail
assembly, use
the rubber mallet to tap the treads
into place.
#3: Placing your foot on the Side
Rail to hold it steady, use the rubber
mallet to tap down the Fixed Ladder
Treads until they are firmly seated
in the Side Rail.
#4: Place the opposite Sid