
Inground Pool Installation Process step by step process showing the installation of in inground pool kit.
![]()
 Digging Your Pool. You will be supplied with a dig sheet like the one to the left. This is the measurements you will use to remove the earth. There will be a two foot over dig to allow for a concrete footer to secure the pool walls at the base. When excavating the bottom of the pool it is important to be as precise as possible to make the rest of the installation easy. This is the foundation of your pool. Just like a house, you will be building off this foundation. A level foundation will make for a long lasting pool structure.
Inground Pool Installation Process
 Wall Structure and Installation
Now you will install your pool walls. These are lined up around the edge of the two foot over dig table. Your panels are bolted together, making sure the panels are level through each step of the process to ensure the liner will fit properly. While the pool panels are being bolted together the braces that keep the pool panels standing upright are installed. The braces help to maintain the pool shape and integrity during the installation process. The braces will be concreted in place to additional strength.
PlumbingInground Pool Installation Process
 Your plumbing is a very important step in the inground installation process. You are going to want to be able to control the water flow to each part of your pool. So take your time to design a plumbing layout to give you the most control of returns, skimmers, main drains, etc. Plumbing can be done with flex hose or hard pipe. We prefer our customers to use flex hose under the ground. This limits the number of joints and possible leak areas. It also reduces the amount of times the water must make a 90° turn which causes restricted waterflow. There is a basic diagram to the left, however your pool should be plumbed to fit your needs.
Inground Pool Installation Process
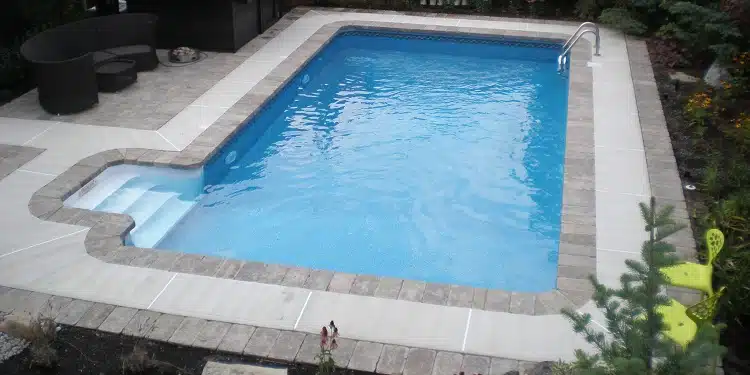
 Coping and Deck Picking your pool coping/deck type go hand in hand. Are you looking for a nice smooth concrete deck? Then you are wanting to go with the bullnose coping and trimline style step. This is a high profile coping with a nice rounded surface. If you prefer pavers then the cantiliver coping and cantilever style step is the choice for you. Cantilever is a low profile meant to allow pavers closest to the pool to hang over to give you an edge determined be the side of the coping.
Inground Pool Installation Process
 Floor and Concrete Footer
Your concrete footer should be poured at least 8 inches tall. It is okay for the concrete footer to flow underneath the panel if there is any space but it is best to not let it get into the pool. During the pouring and drying process clean up any concrete that may run through. After the footer dries you are ready to put down your sand/mortar floor. This will be trowelled 2 inches high and will cover up 2 inches of the inground pool panels. After your floor has dried you should sweep to be sure that no extra sand or debris has made its way into the pool.Inground Pool Installation Process
 Liner Installation The liner should be laid out in the bottom of the pool, rolled out and let to sit for a few hours to make sure it will be able to stretch a little when installing. Now you will snap the bead of the liner into the the bead track on the bottom side of your pool coping. Before you are completely done with this leave enough liner out of the bead track to allow for a vacuum hose to be inserted between the liner and the pool wall. Once the vacuum is turned on it will suck the air from the liner and rid the pool of wrinkles.
Inground Pool Installation Process
 Filling the Pool. It is now time to start filling you pool with water. While the pool is being filled with water the area between the panels and the earth should be back filled with a back fill dirt to let water run through and disperse into the ground. You do not want to cut anything out of the liner at this time (light hole, skimmer, returns, step , etc). Let the pool water get just below the hole to be cut before any incision is made. If a cut is made before the liner will continue to stretch and the hole will not line up
Inground Pool Installation Process
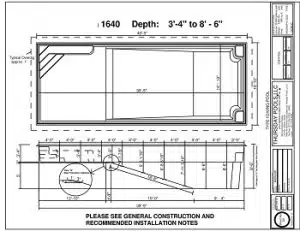 Digging Your Pool. You will be supplied with a dig sheet like the one to the left. This is the measurements you will use to remove the earth. There will be a two foot over dig to allow for a concrete footer to secure the pool walls at the base. When excavating the bottom of the pool it is important to be as precise as possible to make the rest of the installation easy. This is the foundation of your pool. Just like a house, you will be building off this foundation. A level foundation will make for a long lasting pool structure.
 Wall Structure and Installation
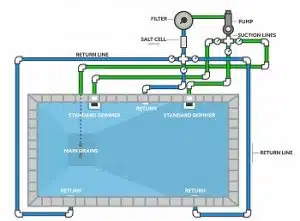 Your plumbing is a very important step in the inground installation process. You are going to want to be able to control the water flow to each part of your pool. So take your time to design a plumbing layout to give you the most control of returns, skimmers, main drains, etc. Plumbing can be done with flex hose or hard pipe. We prefer our customers to use flex hose under the ground. This limits the number of joints and possible leak areas. It also reduces the amount of times the water must make a 90° turn which causes restricted waterflow. There is a basic diagram to the left, however your pool should be plumbed to fit your needs.
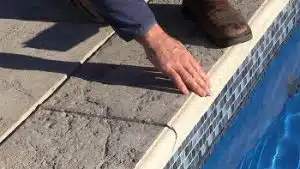 Coping and Deck Picking your pool coping/deck type go hand in hand. Are you looking for a nice smooth concrete deck? Then you are wanting to go with the bullnose coping and trimline style step. This is a high profile coping with a nice rounded surface. If you prefer pavers then the cantiliver coping and cantilever style step is the choice for you. Cantilever is a low profile meant to allow pavers closest to the pool to hang over to give you an edge determined be the side of the coping.
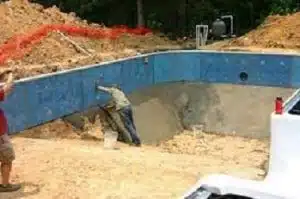 Floor and Concrete Footer
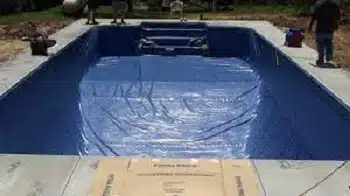 Liner Installation The liner should be laid out in the bottom of the pool, rolled out and let to sit for a few hours to make sure it will be able to stretch a little when installing. Now you will snap the bead of the liner into the the bead track on the bottom side of your pool coping. Before you are completely done with this leave enough liner out of the bead track to allow for a vacuum hose to be inserted between the liner and the pool wall. Once the vacuum is turned on it will suck the air from the liner and rid the pool of wrinkles.
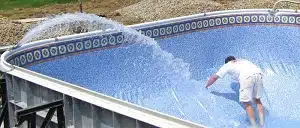 Filling the Pool. It is now time to start filling you pool with water. While the pool is being filled with water the area between the panels and the earth should be back filled with a back fill dirt to let water run through and disperse into the ground. You do not want to cut anything out of the liner at this time (light hole, skimmer, returns, step , etc). Let the pool water get just below the hole to be cut before any incision is made. If a cut is made before the liner will continue to stretch and the hole will not line up
![]()
- Keeping Your Above Ground Swimming Pools Looking New
Keeping Your Above Ground Swimming Pools Looking New
A well-built and well-maintained pool will last for years. But after a while, even the best care will not prevent a pool from showing signs of age.
An old pool, or even a poorly maintained pool, is not a lost investment. A few repairs or simple refurbishings may be all that is needed. If major work is called for, you’ll probably want a pool contractor to do it for you.
Repairing Cracks
In-ground cement or gunite pool walls may crack from earth movements under the shell or around the deck. Hairline cracks are easily repaired with a small amount of plaster, caulking compound or epoxy putty once you lower the water below the damaged area.
Check the extent of the crack. Large cracks may indicate a serious problem, possibly from soil movement or poor drain-age. If a large crack should appear, it may be necessary to drain the pool and you’ll want to consult a pool professional.
Keeping Your Above Ground Swimming Pools Looking New
Replastering Concrete Pools
For best appearance, concrete pools should be replastered about every 10 to 15 years or repainted every 3 to 5 years. This is because daily contact with pool chemicals and changing water temperatures often cause flaking or chipping. Slight damage can be buffed and patched or painted over. In areas where mineral content or water hardness is excessive, it may be necessary to replaster sooner.
Mending a Vinyl Liner
Most tears or punctures arc easily repaired by the pool owner. Some vinyl companies even offer underwater patching kits, so you don’t need to drain the pool for repairs. If you observe any tears longer than 2 to 3 inches you should consider them to be serious. If the repair is very costly to fix, it may be better to replace rather than repair the liner.
Repairing Fiberglass Surfaces
Although this material is strong and durable, after time the smooth finish may fade, chip or discolor. If this occurs, your warranty as many manufacturers cover surface deterioration. If the damage is small, patching the area may be all that is necessary, For larger areas, you may have to recoat the entire pool. A simple coat of epoxy paint may improve the appearance of an older fiberglass shell. Always follow manufacturers’ recommended procedures.
Tile Care
Tile trim along the inner edge of a pool can be very sensitive to shifts in the soil, and it can crack or pop off. You can use stronger glue to re-lay the tile, but if there is actual structural damage, some excavation and rebuilding
Keeping Your Above Ground Swimming Pools Looking New

Paradise Pools Mart
Our You Tube Channel
Inground Pool Installation Process
Paradise Pools Mart
Our You Tube Channel